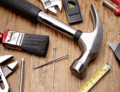
The task of working on windows, the D.I.Y. style, requires a few tools and some simple step that are fairly easy to follow.
How To Do It Yourself
The first step would be to get the precise measurement noted down in order to purchase the material needed accordingly. Testing the fit of the new unit would be wise, before actually installing it permanently. A polyurethane sealant is applied around the existing window frame to ensure it is weather proof, then installation screws are used to fasten it into the solid wood frame. Put in the window, bottom first, and then tilt the top into place, then use thin wedges called shims to center the window.
As for doors, the first step involves measuring the doorway opening and then laying the door on sawhorses. Remember to provide in the measurements an inch or two for carpets to run under the door. Then, apply painter’s tape along the length of the marked out frame and on the plate of the saw, while cutting the door along the mark. Screw the hinges and the door together, then move it through the frame. Once the door is leveled out, nail through the frame to the wall then use low expansion foam to fill the spaces between the door and the wall which should effectively keep the door in place.
As for lighting, the first thing would be to disconnect the power supply which can be done by turning off the circuit breaker or removing the fuse. Remove any coverings and the light bulbs and then disconnect them from the electrical box by removing the screws. Observe the existing connections before replacing them with new ones so that the job can be simply mimicked. The 3 wires are white – negative, black – positive and the green or bare copper – ground wires. The black wire should be connected to the brass screw, the white to the silver screw and green to the green screw. Then remount the fixture and turn the power on.
Salvador Handyman